LEARN
How to Hang Unpasted Wallpaper like a Pro
There are many ways to hang unpasted wallpaper. At Tempaper & Co., we are sharing the best method for hanging our traditional wallpaper below.
Unpasted wallpaper, also known as non pasted wallpaper, does not have a self-adhesive backing like peel and stick wallpaper does. This means that a wallpaper adhesive or paste is required to hang your unpasted wallpaper to its intended surface.
If you are wondering the best ways to install unpasted wallpaper in your space, we are sharing an easy-to-follow, step-by-step guide for you.
While some may choose to hire a wallpaper installer, it is possible to hang unpasted wallpaper by yourself. Just follow these quick steps here.

There are a few wallpaper tools and supplies required to make the process as simple and seamless as possible. Our recommended wallpaper supplies include:
You can find our unpasted wallpaper tool bundle here.

Step 1: Prep
Once you’ve gathered your unpasted wallpaper tools, you will want to prep your walls or surface for installation.
Wipe away all debris with a damp cloth and make sure that your surface is as smooth as possible.
If there are any holes or bumpy areas, spackle and smooth out any rough areas before installation. Furthermore, we recommend removing any face plates or outlet covers.

Step 2: Draw a Plumb Line
It’s important to draw a plumb line, which will act as a guide for your panel. Measure from the corner of the wall the width of the wallpaper minus ½ inch. Mark this spot with a pencil.
Next, place your level at the mark and create a straight, vertical line. This is your plumb line.
You will create a plumb line every time you reach a corner or start a new wall.

Step 3: Measure & Cut
Measure the length of your first panel of wallpaper. It’s important to allow extra paper at the top and bottom for trimming. Using a precision knife, carefully cut your first strip of wallpaper. Continue to align and precut all of the panels you will need for application.
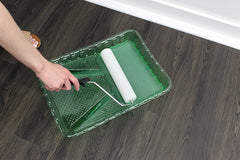

Step 4: Paste The Wall or Paper
Using the paste-the-wall method, apply your wallpaper adhesive to your wall or surface using a paint roller. A paint roller ensure that the adhesive is applied thinly and evenly.
You will only need to cover a small area at a time, usually a little more than the width of your panel.
If you are pasting the paper, use a roller to apply to the pre-cut paper's backing; we recommend testing a small section first to ensure paste does not bleed through paper.

Step 5: Align Your First Panel
Press your wallpaper to the wall, aligning it with your plumb line. The adhesive should allow you to slide your panel into place and realign if needed.

Step 6: Smooth with a Squeegee
Once you have your paper in the right spot, smooth it into place with your smoothing tool or brush.

Step 7: Repeat steps 4-6 and align your remaining panels

TIP: A seam roller is the perfect tool to ensure that your edges ae flat and that you won’t see any seams once the wallpaper is completely dry.

Step 8: Trim
Use your straight edge and precision knife to trim away any excess wallpaper at the bottom and top of your panel.

Step 9: Wipe Your Wall
Wipe away any residue on your wallpaper with a damp sponge and clean water.


